
How To - Modifying Store and Room Layout
The Map Editor allows you to change the position of tables on the plan and add or remove tables to increase the capacity of the venue for events. You can only add tables if they have been defined at head office where table numbers are defined in Aztec or at site when defined in Tables. You can also position the section and server tags appropriately. The controls on the map editor change depending on whether your site is set up for section templates.
Maps – Standard configuration
To modify the position of tables on the plan::
-
Select the Table Planning button. The Table Plan is displayed.
-
Select the Map button. A list of store layout options is displayed:
-
Select Edit.The Map Editor box is displayed.
- Select the required store layout from the drop-down menu.
- Select the required room from the drop-down menu.
- Select New to add a new name or choose Edit to change an existing name.
- Drag tables on the table plan to reflect your site layout as appropriate.
- Add tables by dragging from the Unassigned Tables area onto the plan or remove tables by dragging off the table plan onto the Unassigned Tables area.
![]()
![]()
Maps – Section Templates
Users can create different section templates that make it quicker and easier to allocate staff to groups of tables within your sales area.
Once a table section is configured, you can only assign servers to table sections instead of individual tables.
Section templates can span more than one room, so servers can attend to customers in more than one room if your business model requires it.
By creating a selection of different section templates you can group tables according to the number of servers that are available, for example when three servers are on duty they will look after fewer tables than if two servers were on duty.
When setting up sections, you can change your table plan to view different layouts. This allows you to create section templates that are generic for all layouts or specifically designed for different outlet layouts allowing you to plan different numbers of servers, e.g. for couples-focused evenings such as on Valentine’s day than you might for larger groups typical of corporate events or weddings.
We recommend that you create section templates for as many different server combinations as you are likely to need so that if you are unexpectedly short staffed or need a few additional servers for a big event, you can select the appropriate configuration quickly and easily.
Sections are added incrementally (1,2,3 etc) and selecting Delete will always delete the most recently created section. Therefore if you need to delete section two, you will need to delete section three first. You can only activate one template at a time, but can edit templates whether activated or deactivated.
If you choose to edit an active template, all changes will be applied instantly, so to avoid conflicts we recommend that you deactivate a template before making edits
To define section templates:
- Select the Table Planning button. The Table Plan is displayed.
- Select the Map button. A list of store layout options is displayed:
- Select Section Templates. If the Section Templates option is not available, this feature has not been enabled by head office.
- Select New to create a new section template.
- Enter a name for your new template and select Add. (You can enter up to 25 characters).
- The template is added and you are returned to the Section Templates menu.
-
Select your new template from the drop-down list.
- Select Edit Sections
- Select the section you want to edit from the drop-down list.
- Select the layout you want to view from the drop-down list.
- Select the room you want to view from the drop-down list.
- Select a colour that will be associated with the section by selecting the colour palette, choosing the required colour and selecting outside the colour box to return to the Table Section Editor.
- Select the tables you want to assign to the selected section. The selected tables will be added to the assigned tables section and the table plan automatically.
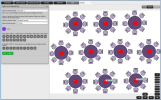
Tables in the selected section are highlighted in red, tables in a different section are shown in grey.
You can select the tables in the assigned list or on the table plan itself to unassign tables and return them to the Available Tables list. -
When you have configured the selected section, you can choose another section from the drop-down list and define the colour and assigned tables as appropriate. You do not need to save the settings for each section separately.
-
Select Save when you have finished configuring your table sections.
![]()
![]()
![]()
![]()